Wednesday, October 31, 2012

Happy Halloween...

Below are some Halloween quilts that I've taken photos of while at two different quilt shows.

This first quilt was at the International Houston Quilt show 2011.  It is an original called, "Witches Brew" by Cathy Wiggins of North Carolina.  This picture does not do it justice.  It is a spectacular quilt with quite a bit of detail.  I wasn't able to take a complete picture because there were a lot of people wanting to view this quilt so I had to hurry.  


This next photo is of the right side of the quilt.  It shows the recipe for the witches wrinkle lotion.  The placard stated that the quilt maker spent over 250 hours of hand embroidery on this recipe part alone.  The entire design, from start to finish is that of the quilt maker.  In person, this quilt was magical to look at.  Congratulations to Cathy Wiggins for such fabulous work.  Thank you for sharing your work for all of us to enjoy.


This next quilt was at the Plano Quilt Show 2012.  It is called, "Baltimore Halloween".  The placard didn't indicate this but, I seem to recognize this pattern as being a Pearl P. Pereira pattern from P3 Designs, if I'm not mistaken.  The card did state that the border was the quilt maker's own design.  This beautiful quilt was appliqued by Dolores Williams-Texas & quilted by Jackie Brown.    I think that most, if not all, of P3 Designs are Baltimore inspired patterns.  The patterns are so gorgeous that you just want to buy them all.  If you're interested, visit www.P3Designs.com for her wonderful patterns.


Close up of center.


Wish I had the time to also make Halloween quilts.  In the interest of time(and giving my fingers & wrists a good rest) I'll have to stick to Christmas & Spring & Summer quilt themes.  

I recently heard the news broadcast that Halloween is the second biggest holiday, in terms of dollars, next to Christmas. 

Happy & Safe Halloween to everyone!

until next time...


Wednesday, October 24, 2012

Outdoor Inspirations...

It's a good idea to get outdoors and get a little sun, clear your head, stretch a bit, & notice what's happening.  Today there was quite a lot of activity...

Butterflies everywhere...

A Yellow Tiger Swallowtail( I think, or is it? I'm a little tired but I think this is accurate).


Orange Fritillary....if I remember correctly...


Bees were also lunching at the same time as the butterflies.  This time on my English lavender.


Last harvest of orange zinnias and peppers for the season.


Then a fluttering sound.  These birds below seemed to be saying, "Are you ready for the cold snap arriving tomorrow night"?  


I hope my English lavender plants survive,


and my Fern Leaf Lavender too.   They smell so good & look so pretty.  


I suppose there is a reason for each season.  For each season to flourish, another must end.  

I guess that's what photo's & glade plug-ins are for(a little humour).  We can bring the outdoors in for a few months until next spring.  

I should sign off because I'm now beginning to ramble.  Have a good evening.

Until next time...


Tuesday, October 16, 2012

Quilt Inspirations...

Where do you turn to when you need inspiration?

Recently, I attended the Dallas Quilt Guild where Sue Spargo was the guest speaker.  She spoke about finding creativity when she travels, in every day life experiences, & sometimes creativity just appears right in front of you.  Afterwards, I made it a point to tell her how wonderful her presentation was & that I was inspired after listening to her.    

Below are a few of her wonderful folk art inspired quilts.  


So sorry the picture is a bit blurry...


Great fall colors...


Here's a Christmas quilt since, the holiday is right around the corner...


After this meeting, I came home very inspired to complete some quilts.  Of course, it takes time & you can only work on one quilt at a time.  I actually have a scrappy half square triangle quilt that I'm quilting at my sewing machine.  When I go downstairs to watch TV with  my husband, I work a little bit on my grandmother's flower garden hexagon quilt.  I don't have any pictures to show just yet but, I will post my progress in a few days.  I also have to remind myself to enjoy the process because hand piecing is something you work on while you're watching TV or at a some sporting event.  I find it very difficult to be sitting still for long periods of time.  If I could do hand work while walking on the treadmill, I would do it.  Hand piecing & walking do not get along together.    

Right now I'm going to go carve out some time for happy hour in my sewing room.

Stay tuned...


Monday, October 1, 2012

Fall Decorating...

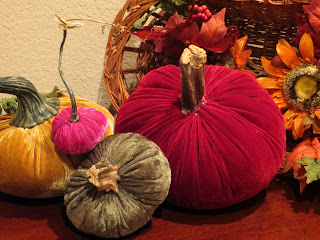
In my previous post, I mentioned that a friend of mine makes these velvet pumpkins to sell when she travels, around the fall holiday.   If she had a store, I would have just bought a few more.  I mentioned it to my husband & he encouraged me to just make time to make some on my own.  

Here's how I went about making them. 

First you need the pumpkins stems.  Find a local pumpkin patch & start there.  Sometimes you might find a few stems laying on the ground.  The vendor let me have the stems since I was buying pumpkins anyway.  


Clean the stems & let them dry for a day or so.  


Afterwards, soak (forty five minutes to one hour) in some bleach & water to kill any mold.  Rinse & then slowly dry them out in the oven.  I set my oven temperature as low as it would go which is 170 degrees & let them sit there for a couple of hours.  

Nicely dried out from the oven.  Ready to be attached to velvet pumpkins.


Make your velvet pumpkins.  Think of making yo-yos & then filling the yo-yo.  I made the first few like in the photo below(no hem).  Didn't like the raw edges so, I then turned the fabric edge over (to form a hem) & I like that the edges come together much neater.

Add filler of your choice, depending on size of pumpkins.  Smaller pumpkins I used barley & larger pumpkins I used beans.


Add a little fiber fill so your beans, etc. do not spill out & whip stitch the opening shut.


I made several at at time so that I could glue the stems on in an assembly line process.


Glue your stems on to pumpkins.  I used a hot glue gun at first then I switched to E6000 (found at Hobby Lobby).  The hot glue gun dries quickly but, E6000 is stronger.  

Great for decorating your mantel.


Your dining table.


Buffet tables.


Side tables.


Coffee table, of course.


I'll probably make more but, I need to take a break & move on to something else.  I can think of other areas that would look great with these pumpkins.

Warning:  Once you make one, you won't be able to stop.  Making these velvet pumpkins is addictive.  They are so elegant.  

Where to buy them?
If you don't want to make these then, you may buy them.  Since, I began making these, I went online to find other resources & I stumbled upon the two companies that started the velvet pumpkins craze.  Visit www.hotskwash.com or www.plushpumpkin.com.  Once you go to their web sites, find store locators for the closest store in your state. 

If you have any questions about my process, simply leave a comment & I'll get back to you as soon as I can.

Have a great day!