Thursday, April 26, 2012

Roses & Bird Applique

Four Weeks Progress.....


My applique is coming along slowly because I've been getting outdoors to enjoy the beautiful weather & garden.   I actually should confess that I've gotten outdoors to do a lot of weeding.   I'm trying to keep positive about weeding in that I'll find inspiration while I'm doing this type of gardening.  So I put on my gardening cap, gloves, & camera in my pocket to capture Mother Nature's gifts from the garden.

This bee enjoys the Spanish Lavender......


Surprisingly, these petunias below grew in between the pansies.  I planted the petunias in this spot last year.  I would not have paired these two plants together but, they like each other & are getting along just great.  


I found the inspiration I needed in a potted plant on my patio.  English Ivy is a great filler plant for containers & as an applique subject.   When I started the applique on my table runner, I only drew a little bit at a time.  I'll reveal the entire drawing as I finish sewing the section I'm working on, in a later post.   


Drawing from my sketchbook......


So, I hand stitched the veins......  Although this two strand embroidery floss shows up well below, it's too much for the entire design & lighting in my dining room.  I tried another color.....scroll down below to see photo.


This lighter color may not look as defined as the darker floss above.  However this color looks better with the entire design, when placed on my dining room table.  Some areas of your applique look best when enhanced with a small amount of embroidery.  Otherwise, your results will just look heavy & overdone.   Veins below done with one strand of embroidery floss in a light yellow green color.  Of course, with your own applique you may choose whatever color is most pleasing to you.


And so the hand stitching continues............on a different day.   It's a gorgeous day again, & I need to continue with the outdoors.

I'll post some progress in a few days.......keep stitching a little at a time.

Enjoy your day!


Wednesday, April 18, 2012

Garden Friends....

One morning I was outdoors looking at my pansy garden to see if they needed any TLC.   


They looked okay & then I stumbled upon this.....disappearing pansy petals.


After staking out my garden throughout several days, I found out who was enjoying my pansies......


Here's a close up of this adorable, cute rabbit.   I'm not stopping him/her from eating my pansies.  I like to think that my pansies taste delicious (unlike my cooking) so this is why this rabbit keeps coming back.


He/She is camera shy so, I'm very lucky to have taken this shot.   

Enjoy your day!


Monday, April 16, 2012

Roses & Bird Applique

Three weeks of applique.

I'm making progress with this applique.  I'm excited that it's taking shape & actually looking like what I imagined it might look like.


A closer look.
 Since my last hand applique quilt, I've come to the realization that some embroidery, here & there, adds a lot of interest to applique.  Below, I've drawn a light white circle around the area where I will embroider part of the bird's eye.  Some people are quite skilled when working with teeny, tiny circles.   I'm going to keep it simple.  Applique-ing tiny shapes is a skill I might tackle some other time.  I usually wait to embroider after the entire applique is done on a block.  However, I'm too anxious to see how this bird will look with embroidery.   This is one way that I work to keep from getting tired of my project.  It's sometimes a challenge to stay with the same project for weeks at a time for me.


I've embroidered the eye with a stem stitch all the way around.  First white floss around the eye then, a beige color around the outside.  Two stab stitches for the eye highlight.  I also thought I would soften the black fabric by making small straight stitches with black floss around the area.   Notice the white/gray fabric for the wing.  This is the same fabric I used for the beak.  I did use some fabric markers to darken the beak with a little gray & black.  I then used a not quite black floss to embroider the beak.  This didn't take too long to do.  

A close up of the small flower.
Straight stitching around the flower with a cluster of french knots in the center.  I also used simple straight stitches around the petals.


This photo below is what I've completed so far.
I'm not yet done with this side.  I still need to embroider veins onto the leaves & a few vines.
I think I'm going to applique a different bird on the opposite side of this table runner.  I don't want to applique the same bird all over again.


Today is the beginning of week four.   I might be able to embroidery a vine or two.  

Stay tuned.....I'll post my progress in two weeks! 


Monday, April 2, 2012

Roses & Bird Applique

Finding The Time.....

Lately, everything else seems to take priority over the applique that I would like to accomplish.  My husband recently thought we should spring clean out our garage.  I couldn't refuse because it had to get done.

When I want to sit & sew but can't I do the next best thing.  That is to open my sketch book & make a note or scribble down an idea that I would like to tackle someday.  Since you never know when inspiration will strike you, it's important to have my camera with me.


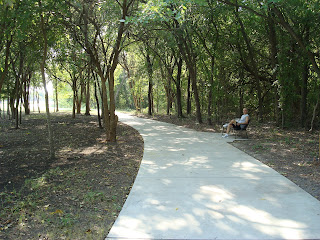
During a recent walk with my husband I'm pretty sure I spotted what resembled several Cedar Waxwing birds.  That's my husband in the photo below, waiting patiently for me to take my photo of these very pretty birds.


In person I could see a lot of yellow around the belly of this bird & a little bit of red too.   As soon as I tried to get close enough to take a photo, the birds would fly away.  This one bird was a bit of a ham & stayed on this branch long enough for me to take the photo.


So I took this bit of inspiration & doodled the drawing below for a future quilting design/applique.


From this doodle, I came up with a drawing for the following applique design.  The bird in the drawing below isn't a Cedar Waxwing but, a bird whose colors would work best with the colors in my roses & background fabric.


I started this hand applique & I think this is going to be a table runner.  I've gotten as far as the photo below.    It's a bit of a challenge because the applique shapes are small.  I just have to keep reminding myself to focus on going slowly instead of hurrying to the finish line.  


I'll post the progress I've made in a couple of weeks or so.  

Until next time.......keep going....one stitch at a time.


Thursday, March 15, 2012

Use of Lights, Mediums, & Darks

This beautiful quilt below was exhibited in the Houston Intern'l Quilt Show - 2011.  It is called, "Merryed in Wynter", by Karen Price -Oklahoma.


Techniques:  Needle turn applique, couched surface embellishment, hand embroidery, hand quilting & beading.


This quilt design is original with the birds pattern adapted from Jane Townswick's book, "Applique Takes Wing".  


When I was a little girl, my grandmother would say to me that anytime you spotted a cardinal, you would have good luck come your way!  My grandmother had a wonderful knack for embellishing her stories.   It was her way of making my childhood magical.  She is no longer with us but, I do remember this memory anytime I see cardinals & this brings a great big smile to my face.

Closeup of the couched small vine.  Stunning!!!


Looking at this quilt is just what I needed to inspire me to continue some of my hand applique work.   So I'm going to unplug from my computer for a while.  I'll be able to get at least three shapes done before dinner.   Hand applique is doable in baby steps.......a little each day.......or so......

Until next time.....


Wednesday, March 14, 2012

Lights Mediums & Darks

We quilters first learn about value in simpler terms called lights, mediums & darks.   Artists who have to mix paints also learn about lights, mediums & darks but refer to this as value in color.  If you are a quilter who isn't interested in learning these terms it's probably more fun to simply look at fabric by thinking of lights, mediums, & darks.  It's what makes scrappy quilts look gorgeous.

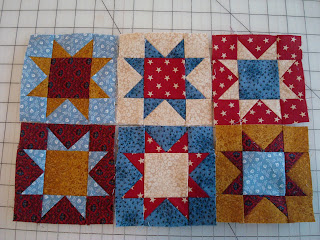
This photo below is an example of lights, mediums & darks.  In fact, these are 4 1/2" star blocks that I just finished working on for my local guild's raffle quilt for next year.

After sewing the flying geese sections of these blocks I was going to be left with the little bitty triangles.  So before I cut off the triangles from the corners, I sewed them together.  Then I cut them off & pressed them.  I couldn't bear to throw them away these perfectly cute half square triangles.  So I sewed these together & here you have a four patch that appears to be a 1 7/8" by 1 3/4" square.  

So here are the rest of the half square triangles from the star block flying geese.  So what am I going to do with them, you ask?   I don't know.  This is the beauty of it.    When I quilt, sew, or draw, it is my own creation.   No one is around to tell me to do it this way or that way or who is this quilt for?   I do know one thing for sure......these itty bitty wonky four patches will not be in any quilt show.  


I'll have another post for tomorrow.  For now good night.....


Wednesday, March 7, 2012

Value In Color of Fabrics

Didn't think I would be able to post this week but, fortunately here is a look into the value in the color of fabrics for this week.   I needed to step away from the subject of pansies/flowers so, I decided to look at a completely different color & subject for this week. 

Below is a quilt that was exhibited at the Houston Intern'l Quilt Show-2011 by Carol Fletcher of Washington.  It is called, "It's Risky Being A Beer Drinking Mantis".   This is an original design inspired by Carol's friend's empty beer glass.  Techniques used to make this quilt was hand beading, soft edge applique, free motion quilting, & hand dyed fabrics.  Notice Carol's careful use of lights & darks to create the illusion of an empty glass with beer foam.  


Pretty cool quilt, don't you think?


I'll post again in another couple of weeks or so.    I'm finding that I need to take some time to unplug from the computer and get back to basics.  That is, basically spending some time in my sewing studio to sketch, sew, and/or quilt.  

Try to carve out some time for happy hour in your sewing room.......

No alcoholic beverages please.  Otherwise, you may wind up with some unintentional hand-dyed fabrics.

Until next time....


Wednesday, February 29, 2012

Purple Value Study

This week I've continued with studying values.  When studying the values in fabric, it helps to have a reference tool that is small.  Like the one below created by Joen Wolfrom called, "3-in-1 Color Tool".    The greatest invention right up there with the rotary cutter. 


This is a great color guide to take with you to your local fabric store, or to your fabric stash, when studying the values in the whatever project you're trying to work with.  This color guide fans open so you may easily select the colors that you see before you.  For example, from the Purple, Red-Violet, & Violet cards I pulled every value of purple obvious to me from my reference photo of the pansy below.

Below are the fabrics I used from my stash.  I didn't want to go buy more fabric.  I had to either work from my present fabric stash or use textile paints.  My challenge for myself was to only use fabrics & no paints.


I traced my shapes based on my pansy photo above on to fusible web using Pellon 805 Wonder Under.  I began to fuse my shapes into place beginning with the foundation petals of the flower.


Fast forwarding to almost finished.....


It's not yet quilted but, I wanted to post my progress.  At this point, I usually take a break from it just to make sure I'm happy with the values in place.  The colors are not exactly like the photo because I didn't have those exact colors in the right values.  So I used a different color/value so that I could work with the fabrics in my stash.   After this week, I may break down & go shopping for the values I need to make the purples look exactly like the purple in the photo. 

Using the 3-in1 Color Tool was very helpful.  Especially since I didn't have the exact purples like in the photo.  If you don't know how to use the color guide just simply follow the direction written on the back.  You can find this color tool at most local quilt shops. 

I hear the garage door opening so this means my husband is home.  Time for dinner.  I'll continue this color study next week. 

Happy Quilting.........